
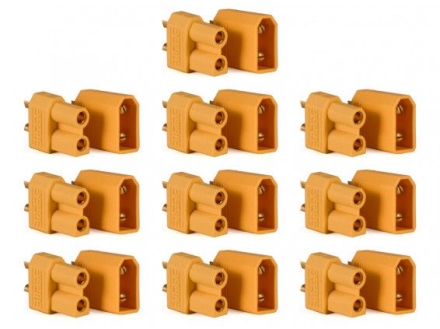
XT30 vs XT60 vs XT90:
How to Choose the Right LiPo Connector + Wire Gauge Tips
- Why connector choice matters more than people think
- XT30 / XT60 / XT90: what each one feels like in the real world
- The 30-second pick: which connector most people actually want
- A practical add-on: when connector choice starts showing up as heat or sag
- Wire gauge (AWG) tips: why connector size alone is not the whole story
- Matching connector size to wire size, lead length, and actual load
- Adapters and “I bought the wrong plug” reality
- A quick real-world note on XT30 to XT60 adapters
- How to solder XT connectors without creating your own problem
- Other LiPo connector types you may still see
- What to check after a run if a connector feels hot
- FAQ
Why connector choice matters more than people think
Most people only start caring about battery connectors when something feels off. The model flies, technically — but punch-outs feel softer than expected, voltage sags earlier than it should, or the lead comes down warmer than your instincts say is normal. That is usually the point where the connector stops feeling like a tiny plastic detail and starts feeling like part of the whole power system.
That is exactly what it is. The connector, wire, solder joint, and lead length all sit in the same current path. When resistance goes up, energy turns into heat. In a real FPV or RC setup, that rarely shows up as a neat lab-style warning. It shows up as a slightly lazy climb, a battery lead that feels hotter than the pack should, or a system that “works” until you ask it to do repeated hard bursts.
This is why online connector arguments often sound contradictory. One pilot says XT30 is totally fine. Another says XT60 is the only sane default. Someone else uses XT90 on everything bigger than a small quad. They can all sound right because they are usually talking about different models, different currents, different lead lengths, and different tolerances for compromise.
XT30 / XT60 / XT90: what each one feels like in the real world
Specs matter, but behavior matters more. Most hobbyists do not remember a connector because of a printed current figure. They remember whether it stayed cool, whether it felt bulky on the build, whether it was easy to solder, and whether it solved problems or quietly created them.
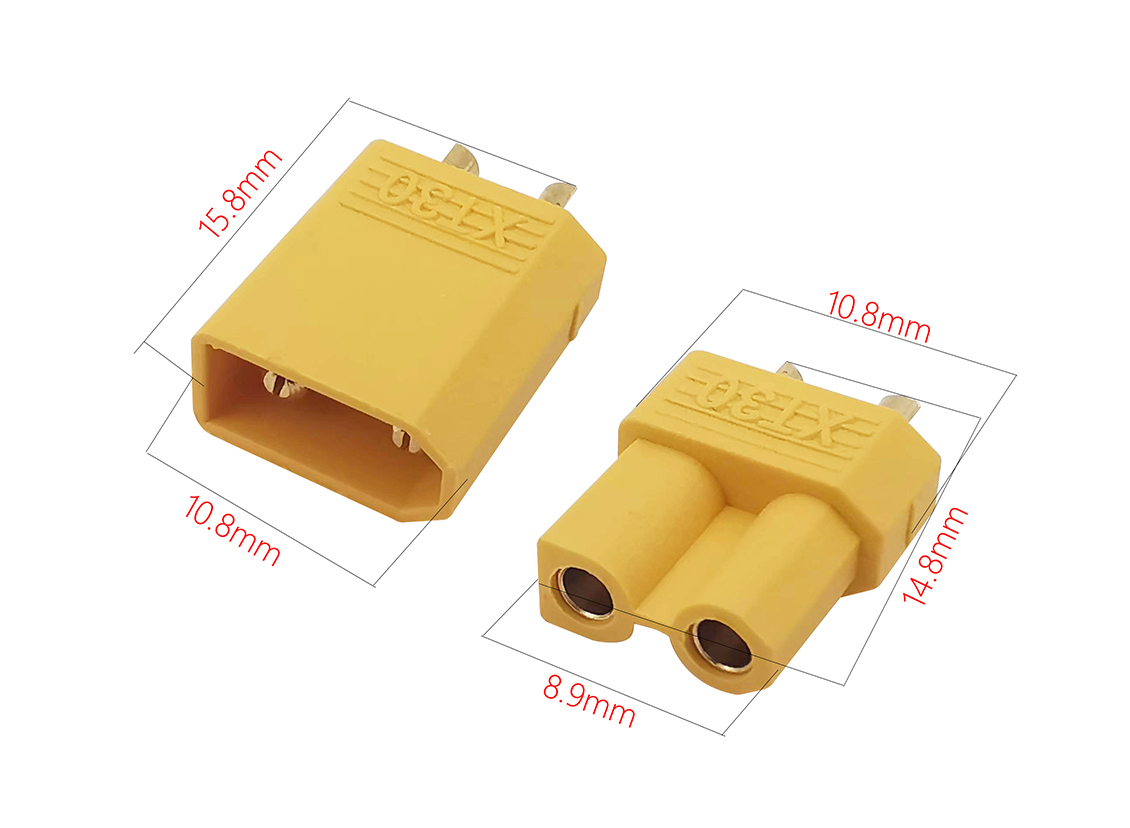
XT30
XT30 is the “small and tidy” answer. It makes a lot of sense on lighter quads, micro wings, compact RC systems, and builds where every bit of space and cable flexibility matters. It is commonly associated with roughly 15A continuous / 30A burst territory and is often paired with 18AWG wire.
The catch is not that XT30 is weak. It is that it gives you less margin. If the setup is efficient and the lead is short, XT30 feels great. If the model sees repeated hard throttle bursts, has a long lead, or runs through adapters, XT30 is usually the first place where heat and sag start becoming noticeable.
HK link: XT30 (10 pairs)
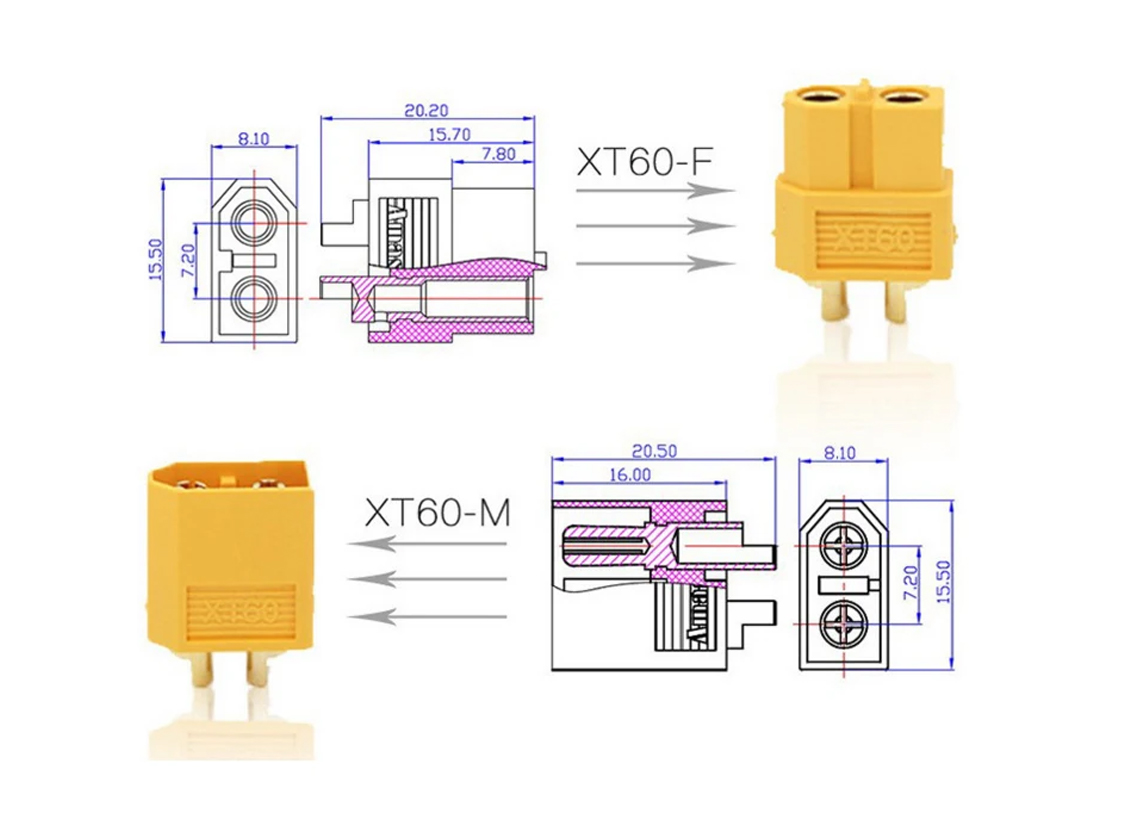
XT60
XT60 is the connector people stop thinking about — and that is actually praise. It is the common default for a reason. Many freestyle drones, RC planes, cars, and general-purpose LiPo systems land here because it gives useful headroom without making the lead huge or awkward. You will often see XT60 associated with mid-power setups, commonly paired with 12AWG to 14AWG silicone wire.
Most “XT60 problems” are not really XT60 problems. They are usually bad joints, unnecessary adapters, thin wire, or lack of strain relief. In other words, XT60 is often the least-regret connector when the model is not especially tiny and not truly huge.
HK link: XT60 (10 pairs)
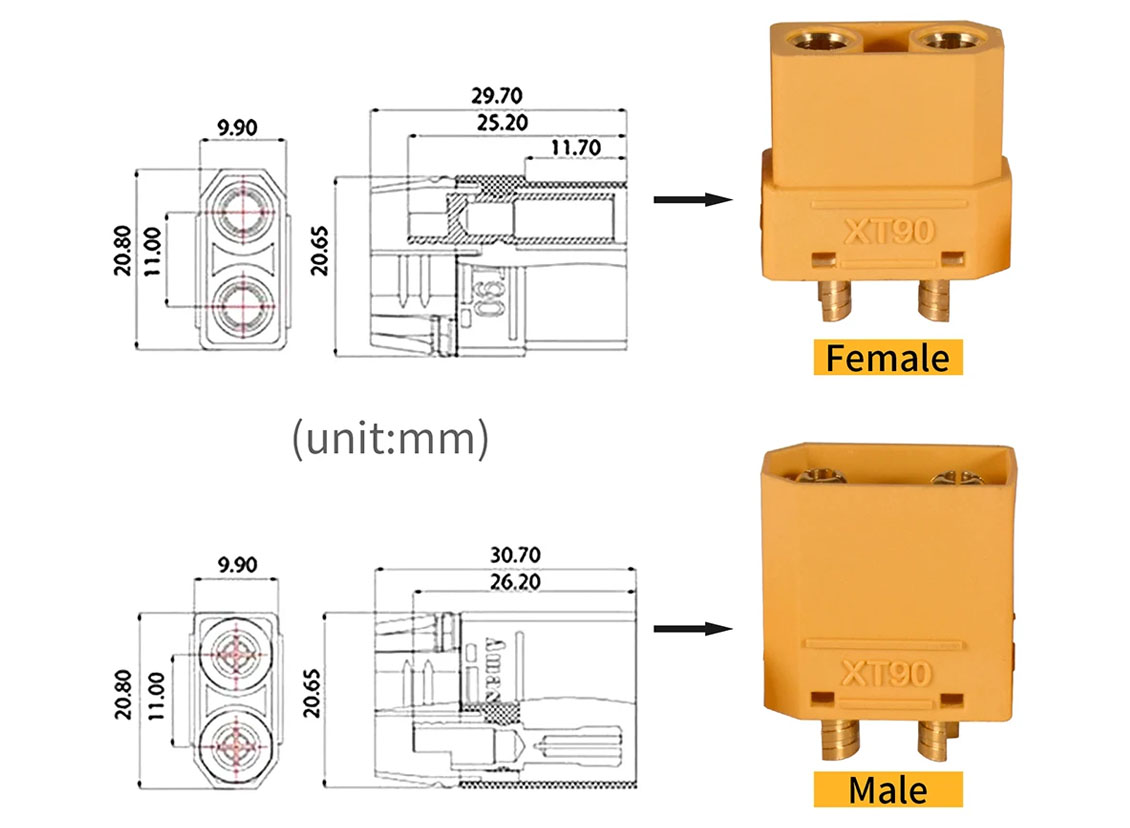
XT90
XT90 is for setups that are genuinely large enough to benefit from it: bigger aircraft, stronger cars, boats, larger packs, and systems that pull harder for longer. It is commonly linked to high-current use and often paired with 10AWG or similarly heavy cable.
In the right place, XT90 is the correct tool. In the wrong place, it can feel like bolting a broom handle onto a small build. The lead gets stiffer, the connector gets bulkier, and the whole front end starts acting like a lever unless you manage strain relief properly.
On bigger systems, this is also where XT90S anti-spark becomes worth mentioning. If plugging in feels like a tiny welding demo, anti-spark is not overkill — it is often just cleaner system design.
HK link: XT90 (10 pairs)
The 30-second pick: which connector most people actually want
Here is the honest version. If you want the least complicated answer, XT60 is still the safest default for a lot of hobbyists. XT30 is great when the whole build is intentionally light and compact. XT90 makes sense when the system is truly big enough to justify thicker wire, more current headroom, and a physically larger connector.
| Your setup | Best first pick | What usually goes wrong |
|---|---|---|
| Small FPV quad, micro wing, low-power compact RC build | XT30 | It works well until current spikes, adapters, or long leads start eating up your headroom. |
| Typical 4S–6S FPV, many RC planes, medium-power general builds | XT60 | People blame the connector when the real issue is thin wire, poor soldering, or too much adapter stacking. |
| Large aircraft, stronger cars, boats, high-capacity packs, longer high-load pulls | XT90 | Using it on a system that does not need it creates unnecessary bulk and stiffness without solving anything. |
A practical add-on: when connector choice starts showing up as heat or sag
One practical point worth adding here is that connector choice usually does not show its full effect on the bench. It shows up when the model is being used the way people actually use it — repeated punch-outs on a freestyle quad, a car that keeps getting hammered on grass or dirt, or a setup that stays at higher throttle long enough for heat to build.
That is why a connector discussion can feel strangely abstract until the first time a setup comes down with a warm lead, softer punch than expected, or voltage sag that seems worse than the pack alone would suggest. At that point, the connector is no longer just a plug. It is part of the power path that is either giving you margin or quietly taking it away.
In real-world use, this also explains why the same connector can feel completely fine on one model and slightly frustrating on another. A tidy, efficient small build can live happily on XT30. A more aggressive mid-power setup can feel noticeably more relaxed on XT60. A genuinely larger system may need XT90 not because it looks “serious,” but because the rest of the system is already living in that higher-current world.
Wire gauge (AWG) tips: why connector size alone is not the whole story
AWG stands for American Wire Gauge. The annoying part for beginners is the numbering: smaller number = thicker wire. So 14AWG is thicker than 18AWG, and 10AWG is thicker than 12AWG.
That matters because the connector is only one part of the power path. If you install a larger connector but keep a thin lead, a long wire run, or weak joints, you may have changed the look of the setup more than the actual electrical bottleneck. This is exactly why some “upgrades” feel strangely underwhelming.
| Common wire range | Typical current feel | Where you usually see it |
|---|---|---|
| 18–22AWG | Light-duty / lower-current | Small packs, compact systems, XT30-type territory |
| 12–14AWG | Mid-power / common RC-FPV range | Many XT60 setups, general-purpose drones, planes, and cars |
| 10AWG and up | High-current / larger systems | XT90-class setups, larger aircraft, bigger cars, boats, high-capacity packs |
This is a guideline, not a law carved into carbon fiber. Real systems vary by lead length, burst behavior, airflow, connector fit, and how hard the model is actually driven. But as a matching mindset, it is useful: the bigger the current and the longer the supply path, the more wire gauge starts mattering.
Why silicone wire shows up everywhere
Silicone wire is not magic. It is just better suited to the abuse RC and FPV systems deal with. It tolerates heat better during soldering, stays flexible after repeated bending, and is easier to route through tight spaces. On vibrating airframes and crash-prone builds, that extra flexibility is not a luxury. It helps reduce stress on the solder joints and connector housing.
Matching connector size to wire size, lead length, and actual load
This is the part that gets missed most often. Hobbyists sometimes treat connectors like an isolated decision: choose XT30, XT60, or XT90, and the job is done. In reality, the connector only makes sense when it matches the rest of the system.
A very common example is the “XT30 to XT60 upgrade” on a setup that was getting warm. Sometimes that solves the problem. Sometimes it only makes the front end look more serious while the real restriction stays exactly where it was — thin wire, long battery lead, mediocre solder joint, or all three together.
The opposite mistake happens too. People see a thick wire and assume the small connector will be fine because “the cable is already upgraded.” But the connector still has to carry the current, survive repeated plugging, and stay mechanically stable under vibration.
What matters is the whole path:
- battery lead gauge
- connector size and fit quality
- solder joint quality
- lead length
- actual current draw, not just the battery label
Adapters and “I bought the wrong plug” reality
Let’s be realistic: connector mismatch happens all the time. You buy a great battery, but it has XT90 and your model is XT60. Or the next build is tiny and suddenly everything on your shelf feels too large. This is why adapters exist.
The practical rule is simple: adapters are fine for temporary compatibility. They are useful for testing, for field fixes, and for getting through a flying day without doing bench work in a parking lot. But they are rarely the cleanest long-term answer.
Every adapter adds another contact point, another physical hinge, and another place where looseness, heat, or intermittent connection can show up. A short, tight-fitting adapter is one thing. A long dangling adapter chain is basically an invitation for weird behavior later.
A quick real-world note on XT30 to XT60 adapters
A related issue that comes up a lot in real setups is the XT30 to XT60 adapter. It is easy to treat this as a harmless convenience, and sometimes it is. If the setup is light, the run is short, and the current demand stays modest, an adapter may not cause any obvious issue at all.
Where people get caught out is when that temporary fix becomes part of a setup that is no longer especially light or gentle. A 5-inch quad that sees repeated punch-outs, a car that spends a full pack under hard acceleration, or any system with longer leads can make that extra connection point show up as heat, sag, or a slightly duller feeling under load. In those situations, the adapter is no longer just solving compatibility. It is becoming part of the restriction.
The tricky part is that this usually does not look dramatic at first. The model still powers up. It still runs. But the adapter may come down hotter than the battery leads, the system may feel stronger at the start of the run than near the end, or the connector fit may start feeling looser over time. That is usually the point where it makes more sense to stop living on the adapter and convert one side properly.
How to solder XT connectors without creating your own problem
You do not need to be an electronics expert to change a connector cleanly. You mainly need to avoid two beginner traps: not enough heat and too much time. Too little heat gives you cold joints. Too much time softens housings and turns a simple connector swap into a distorted plastic mess.
The tools that actually matter
- A soldering iron with enough power: fast heat is usually safer than slow cooking.
- Flux: this makes solder flow instead of fight you.
- Helping hands or a clamp: movement while cooling creates weak joints.
- Heat shrink: slide it on before soldering. Everybody forgets once.
- Multimeter: polarity and short checks are your “no-smoke” insurance.
The one-wire-at-a-time method
- Step 1: Cut the old connector off. Strip only one wire first.
- Step 2: Slide heat shrink onto that wire before soldering.
- Step 3: Pre-tin the wire and the connector cup.
- Step 4: Join them quickly with enough heat to flow properly.
- Step 5: Let it cool, insulate it, then repeat for the second wire.
- Step 6: Check polarity and make sure + and – are not shorted before first power-up.
After soldering: checks that save money
| Quick check | How to do it | Why it matters |
|---|---|---|
| Polarity check | Use a multimeter to confirm red is + and black is – at the output | Prevents instant reverse-polarity damage |
| Short check | Verify there is no continuity between + and – | Catches stray strands or solder bridges |
| Tug test | Give the wire a firm controlled pull at the joint | Finds weak joints before vibration does |
| First power-up | Use a smoke stopper if you have one; otherwise plug in briefly and watch closely | Limits damage if something is wrong |
| Heat test | After a run, touch the connector and first part of the wire | Confirms the power path is not turning into a bottleneck |
Other LiPo connector types you may still see
This article focuses on XT30, XT60, and XT90 because they are the most useful connector family for many modern RC and FPV setups. Still, you will run into other connector types, especially on older gear, brand-specific ecosystems, or very small batteries.
| Connector type | Where you still see it | Quick reality check |
|---|---|---|
| T-plug / Deans | Older RC gear, traditional hobby setups | Still used, but many higher-load users have moved toward XT connectors for convenience and consistency. |
| EC3 / EC5 | Some brand ecosystems, planes, cars | Perfectly usable; just less universal if most of your fleet already runs XT. |
| Bullet connectors | Testing, ESC/motor connections, temporary bench use | Great electrically, but not ideal as a general battery main connector without secure housing. |
| JST / SM-3P / tiny 1S plugs | Small 1S packs, micro drones, indoor fixed-wing, tiny helis | Very common in micro gear, but not meant for the current demands that push people toward XT60 or XT90 decisions. |
The short version is this: yes, other connector types exist and still matter. But if you are trying to understand the main connector logic for modern LiPo-powered RC and FPV systems, XT30, XT60, and XT90 are still the first family worth learning properly.
What to check after a run if a connector feels hot
One last practical add-on here: if a connector, adapter, or battery lead feels hotter than expected after a run, it helps to check a few simple things before assuming the battery itself is the whole problem.
- Compare temperatures, not just one spot. If the adapter or connector is clearly hotter than the main wire, that is a stronger clue than “the system felt warm.”
- Check whether the problem gets worse later in the run. A setup that feels normal early but softer later is often showing the effect of heat increasing resistance.
- Look at fit quality. If the connector has started to feel loose, that can increase contact resistance and make heat build faster next time.
- Inspect the housing. Slight glossing, discoloration, softening, or deformation around the plastic is not just cosmetic wear. It usually means the connection has been running hotter than it should.
These checks are simple, but they help separate normal warmth from a power-path issue that is worth fixing properly. In many cases, the battery gets blamed first when the real problem is that the connector chain is adding more resistance than the setup wants.
FAQ
For most 4S–6S builds with a 2200mAh pack, XT60 is the safer default. Not because 2200mAh automatically means “huge current,” but because the kinds of builds that run packs like that often have enough punch to create strong current spikes. That is exactly where extra connector headroom becomes useful.
XT30 can still work on efficient, lighter setups. The issue is that once you add longer leads, harder throttle bursts, or even a mediocre adapter, you are using up your margin faster. XT60 simply gives you more room before heat and sag start showing up as real annoyances.
Sometimes yes — and this is exactly where people accidentally make a cosmetic upgrade. If the lead is still too thin, too long, or badly soldered, a larger connector may not remove the real bottleneck. It just changes one visible part of the chain.
If your reason for upgrading is heat, softness on punch-outs, or suspicious voltage sag, look at the whole power path together: connector size, wire gauge, lead length, and joint quality. A better connector helps most when the rest of the setup is also in the right range.
Yes — people do it all the time for field repairs or short-term compatibility. The honest downside is usually not some dramatic “instant performance loss.” It is extra bulk, extra failure points, and extra places for heat to build up.
If you are doing it temporarily, keep the adapter short and tight-fitting, and do a quick post-run heat check. If it is becoming a long-term habit, resoldering the correct connector is usually cleaner, lighter, and more reliable than living with a permanent dongle tail.
XT plugs stop you from plugging them in backwards, but they do not stop you from soldering them backwards. Reverse polarity is not a small mistake that just makes the model weaker. It can instantly damage ESC, FC, or other power-side electronics.
The safest real-world habit is simple: do one wire first, insulate it, then do the second wire. Finish with a multimeter polarity check before the first power-up. That routine prevents a surprising number of expensive accidents.
XT90S usually makes sense when the system is large enough that plugging in the pack produces a noticeable spark. That is more common on higher-voltage, higher-capacity, or generally bigger power systems where repeated sparking starts to feel harsh on the connector and annoying in daily use.
It is usually more relevant for larger aircraft, stronger cars, boats, and big-capacity batteries than for everyday small or medium FPV builds. If plugging in already feels like a little electrical snap every time, anti-spark is worth thinking about.
A little warmth after a run is not automatically a problem. What matters more is context. If the connector, adapter, or first part of the lead feels noticeably hotter than the rest of the power path, that usually means resistance is concentrating there.
In other words, “warm” by itself is not the whole story. A connector that is slightly warm but stable is very different from one that keeps getting hotter over time, feels hotter than the wire around it, or starts showing looseness or plastic discoloration.
That pattern often points to heat buildup in the power path. As the run goes on, connector resistance, adapter resistance, or even wire losses can become more noticeable. The system still works, but the extra heat makes it less efficient under load.
This is one reason connector issues are easy to misread. People often blame the battery first, but if the setup feels crisp early and duller later, it is worth checking the connector, adapter, and lead temperature before assuming the pack alone is responsible.


